%20(2).svg)


How to Migrate WordPress to Webflow Without Losing SEO (Technical + Automated)
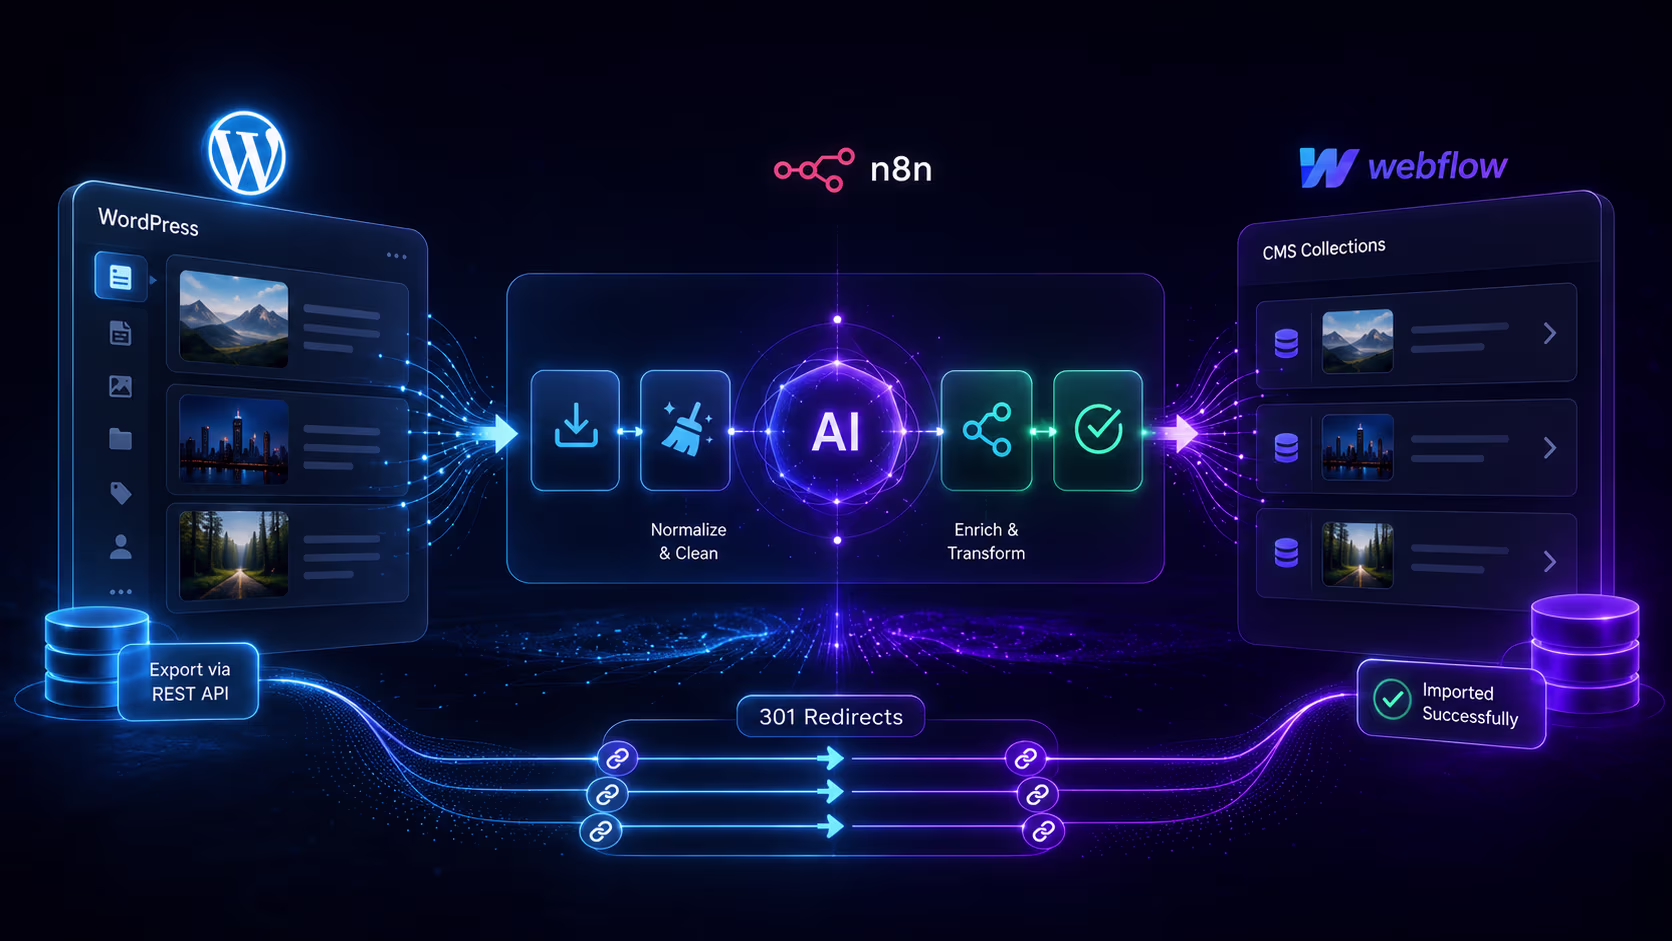
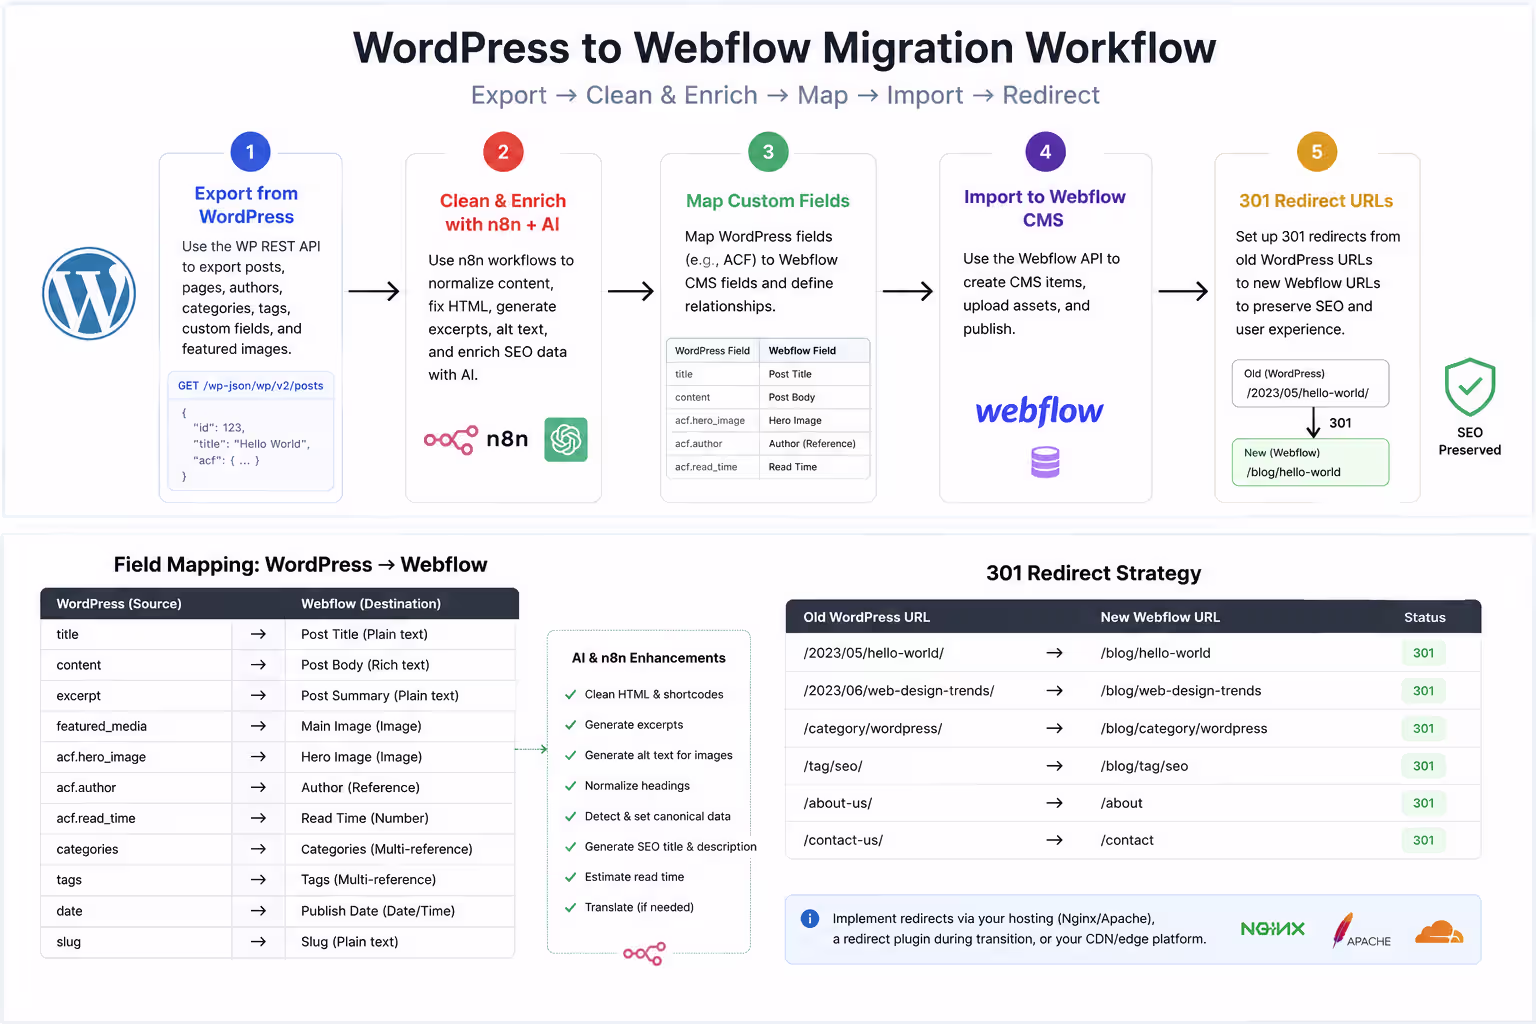
Migrating from WordPress to Webflow is not a copy-paste job — it's a content-modeling and SEO-preservation project. Done right, you export every post and custom field from WordPress, rebuild a clean CMS in Webflow, automate the transfer, and 301-redirect every old URL so you keep your rankings. This workflow walks the exact technical process, with scripts and an n8n automation you can adapt.
The stack we use:
- WordPress REST API — structured export of posts, pages, media, taxonomies, and custom fields (no messy XML).
- n8n (or Make) — orchestration: fetch, transform, AI-clean, and write into Webflow.
- Webflow Data API v2 — programmatic creation of CMS items.
- An LLM (OpenAI / Claude) — clean legacy HTML, generate meta descriptions and image alt text, and map categories.
- Audit and plan the content model
Before touching design, inventory what WordPress actually holds: post types, Advanced Custom Fields (ACF), taxonomies, authors, and media. Each becomes a Webflow Collection or field. The goal is a clean schema, not a 1:1 clone of WordPress's database. A typical mapping:
- Post title → Name
- Slug → Slug (preserve it where possible to protect URLs)
- Content (HTML) → Rich text (Body)
- Excerpt → Plain text (Summary)
- Featured image → Image (Main image)
- Categories / Tags → Multi-reference to a Categories collection
- ACF custom fields → matching static fields (text, number, date, switch, link)
- Author → Reference to an Authors collection (or plain text)
- Publish date → Date
- Redesign, don't replicate
WordPress themes carry years of plugin bloat, inline styles, and shortcodes. Rebuild in Webflow on a clean system (we use Finsweet Client-First) and design components for content variability: what happens when a title runs three lines, a post has no featured image, or an author bio is empty? Design for the extremes, then bind the components to your new CMS. This is where the migration becomes a genuine upgrade in speed, structure, and conversion — not a like-for-like move. - Export from WordPress via the REST API
Every WordPress site exposes a REST API at /wp-json/wp/v2/. Pull everything with pagination, and append ?_embed so the featured image URL and taxonomy terms come back in the same payload — no extra request per post:
const base = "https://old-site.com/wp-json/wp/v2";
async function getAll(type) {
  let page = 1, out = [];
  while (true) {
    const url = `${base}/${type}?per_page=100&page=${page}&_embed`;
    const res = await fetch(url);
    const batch = await res.json();
    if (!Array.isArray(batch) || batch.length === 0) break;
    out.push(...batch);
    page++;
  }
  return out;
}
const posts = await getAll("posts"); // repeat for "pages" and custom types
Automating the migration with n8n and AI
Manual copy-paste of hundreds of posts is where migrations die. Instead, run an n8n workflow that fetches each post, cleans it with AI, and writes it straight into Webflow. The node chain:
- HTTP Request → WordPress REST API (paginated, as above).
- Function → normalize each post into the fields Webflow expects.
- OpenAI / Claude → clean the legacy HTML and generate SEO metadata.
- HTTP Request → Webflow Data API to create the CMS item.
- Wait / Batch → respect Webflow's API rate limit (60 requests/min).
The normalize step (n8n Function node):
return items.map(i => {
  const p = i.json;
  return { json: {
    name: p.title.rendered,
    slug: p.slug,
    bodyHtml: p.content.rendered,
    excerpt: p.excerpt.rendered,
    publishDate: p.date,
    wpId: p.id,
    categories: (p._embedded?.["wp:term"]?.[0] || []).map(t => t.name),
    featuredImage: p._embedded?.["wp:featuredmedia"]?.[0]?.source_url || null
  }};
});
The AI factor: clean HTML + auto-metadataLegacy WordPress HTML is full of inline styles, wrapper <div>s, and shortcodes that break Webflow's rich text. Pass each post through an LLM with a strict contract so the output is clean and Webflow-ready — and let it write the SEO fields you'd otherwise do by hand:
SYSTEM: You are a WordPress-to-Webflow migration assistant.
Given raw WordPress post HTML, return ONLY valid JSON:
{
  "html": clean semantic HTML for Webflow rich text
          (keep h2-h4, p, ul/ol, a, img; remove inline
          styles, shortcodes, and empty divs),
  "metaDescription": SEO description, max 155 characters,
  "altText": descriptive alt text for the featured image
}
Returning structured JSON (html, metaDescription, altText) lets the next node map fields directly. You've now automated the three most tedious jobs in any migration: HTML cleanup, meta descriptions, and image alt text.
Write into Webflow
Finally, create the CMS item via the Webflow Data API. Run it as drafts first ("isDraft": true) so you can review in the Webflow Editor before publishing in bulk:
curl -X POST "https://api.webflow.com/v2/collections/COLLECTION_ID/items" \
  -H "Authorization: Bearer $WEBFLOW_API_TOKEN" \
  -H "Content-Type: application/json" \
  -d '{
    "isArchived": false,
    "isDraft": true,
    "fieldData": {
      "name": "{{name}}",
      "slug": "{{slug}}",
      "post-body": "{{aiCleanedHtml}}",
      "meta-description": "{{aiMetaDescription}}",
      "main-image": { "url": "{{featuredImage}}", "alt": "{{aiAltText}}" }
    }
  }'
Want to apply this to your setup?
Custom fields, media, 301 redirects, and QA
The details that protect your SEO live in the last mile: custom fields, media, and redirects.
Custom fields (ACF)
Advanced Custom Fields are exposed under an acf object on each REST item (enable "Show in REST" per field group, or use the ACF to REST API plugin). Map each ACF key to a matching Webflow field type and add it to your Function node output. Repeating fields and flexible content usually collapse into either a multi-reference or a nested rich-text block.
Media migration
Don't hot-link old WordPress media. For each featured and inline image, download the binary and upload it to Webflow Assets (or push the URL and let Webflow ingest it), then store the new asset URL on the item. This removes your dependency on the old host before you cancel it.
301 redirects (the SEO-critical step)
If your WordPress permalinks differ from your new Webflow paths (e.g., /2024/05/post-name/ → /blog/post-name), every old URL must 301-redirect to the new one. Generate the map programmatically, then import it under Webflow Site Settings → Publishing → 301 Redirects:
const redirects = posts.map(p => ({
  from: new URL(p.link).pathname,   // old WP path, e.g. /2024/05/post-name/
  to: "/blog/" + p.slug             // new Webflow path
}));
console.log("from,to");
redirects.forEach(r => console.log(r.from + "," + r.to));
QA checklist before launch
- Spot-check 10–20 migrated posts for clean formatting, images, and internal links.
- Confirm every old URL resolves to a 301 (crawl with Screaming Frog).
- Preserve titles, meta descriptions, and canonical tags.
- Submit a fresh sitemap in Google Search Console and watch the coverage report.
Q: Will migrating from WordPress to Webflow hurt my SEO?
A: Not if you map every URL to a 301 redirect and preserve titles, meta descriptions, and structure. Done correctly, rankings carry over and usually improve thanks to Webflow's faster load times and cleaner markup.
Q: How long does it take to migrate a WordPress site to Webflow?
A: Most small-to-mid sites take two to four weeks: roughly a week to audit content and model the CMS, one to two weeks to rebuild the design and run the automated content transfer, and a few days for redirects, QA, and launch. Large sites with many custom post types or thousands of posts take longer, but the n8n automation keeps the content-transfer step from scaling linearly with post count.
Q: How do I migrate my WordPress blog and CMS to Webflow CMS without losing posts?
A: Export every post, category, tag, and custom field through the WordPress REST API, map each one to a Webflow Collection field, then push the records into Webflow via the Data API. Because you pull structured data (not a theme scrape), nothing is dropped — posts, authors, featured images, and taxonomies all carry over into a clean Collection.
Q: Will my WordPress plugins and Advanced Custom Fields work after moving to Webflow?
A: Plugins don't transfer — Webflow replaces most of them natively (SEO, forms, hosting, security), so you shed the plugin bloat. Advanced Custom Fields do carry over: each ACF key maps to a matching Webflow field type during migration, so your structured content stays intact even though the plugin itself doesn't come along.
Q: Is Webflow better than WordPress for SEO after migrating?
A: Webflow usually wins on technical SEO out of the box — faster load times, cleaner semantic markup, automatic SSL, and no plugin conflicts — which can lift rankings once the migration is done. The key is preserving your existing equity during the move: 301-redirect every old URL and keep titles, meta descriptions, and structure so the gains add to your rankings instead of resetting them.
Want this done for you?
Webflowforge runs WordPress to Webflow migration end to end — SEO-safe redirects, a clean CMS rebuild, and an automated content transfer.
We pair it with Webflow automation services and AI workflow implementation so the move is fast and future-proof. Tell us about your project and we'll scope it with you.


