%20(2).svg)


AI Webflow Design Workflow: Building Client-First Sites with Banani, Figma, and Claude
The web design landscape has shifted. We are no longer constrained by the old binary of "designing for weeks" or "coding from scratch." By stacking specific AI tools into a unified pipeline, you can go from an abstract concept to a production-ready, flawlessly structured Webflow site in a fraction of the time.
This workflow breaks down how to orchestrate Banani AI (for rapid conceptualization), Figma (for visual staging), and Claude (for structured development) to build clean, Finsweet Client-First websites.
The Three-Tier Architecture
To make this workflow operate without breaking, you must treat each tool as a specialized department in a digital agency. Attempting to skip a step or force a tool out of its comfort zone results in broken code and messy layouts.
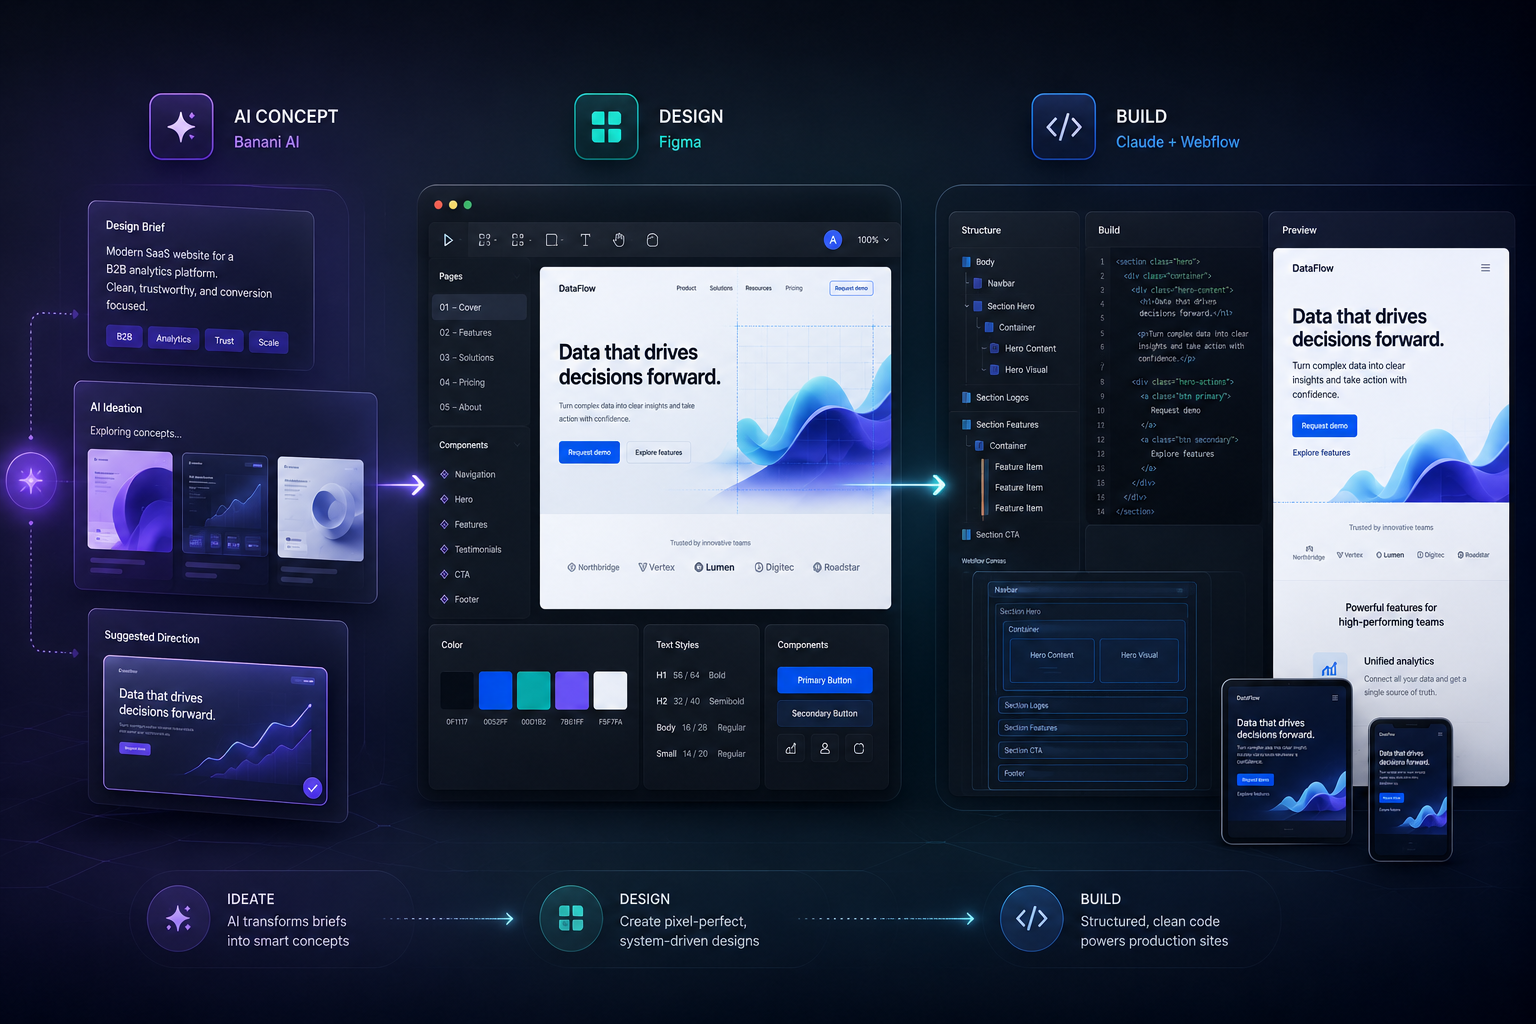
- Banani AI (The Creative Director): This is your rapid ideation engine. Instead of staring at a blank canvas or scrolling through the same inspiration sites, you prompt Banani to generate high-fidelity UI layouts, micro-copy, and aesthetic color palettes instantly.
- Figma (The Staging Ground): AI layout generators create gorgeous visuals but chaotic layer hierarchies. Figma acts as your parsing chamber. Here, you slice the Banani export into semantic sections and extract design tokens (fonts, hex codes, border-radii).
- Claude (The Client-First Developer): Equipped with the Webflow Model Context Protocol (MCP) or copy-paste layout JSON capabilities, Claude acts as your senior developer. By feeding it strict Client-First documentation, it builds out the structural divs and styles directly on your canvas.
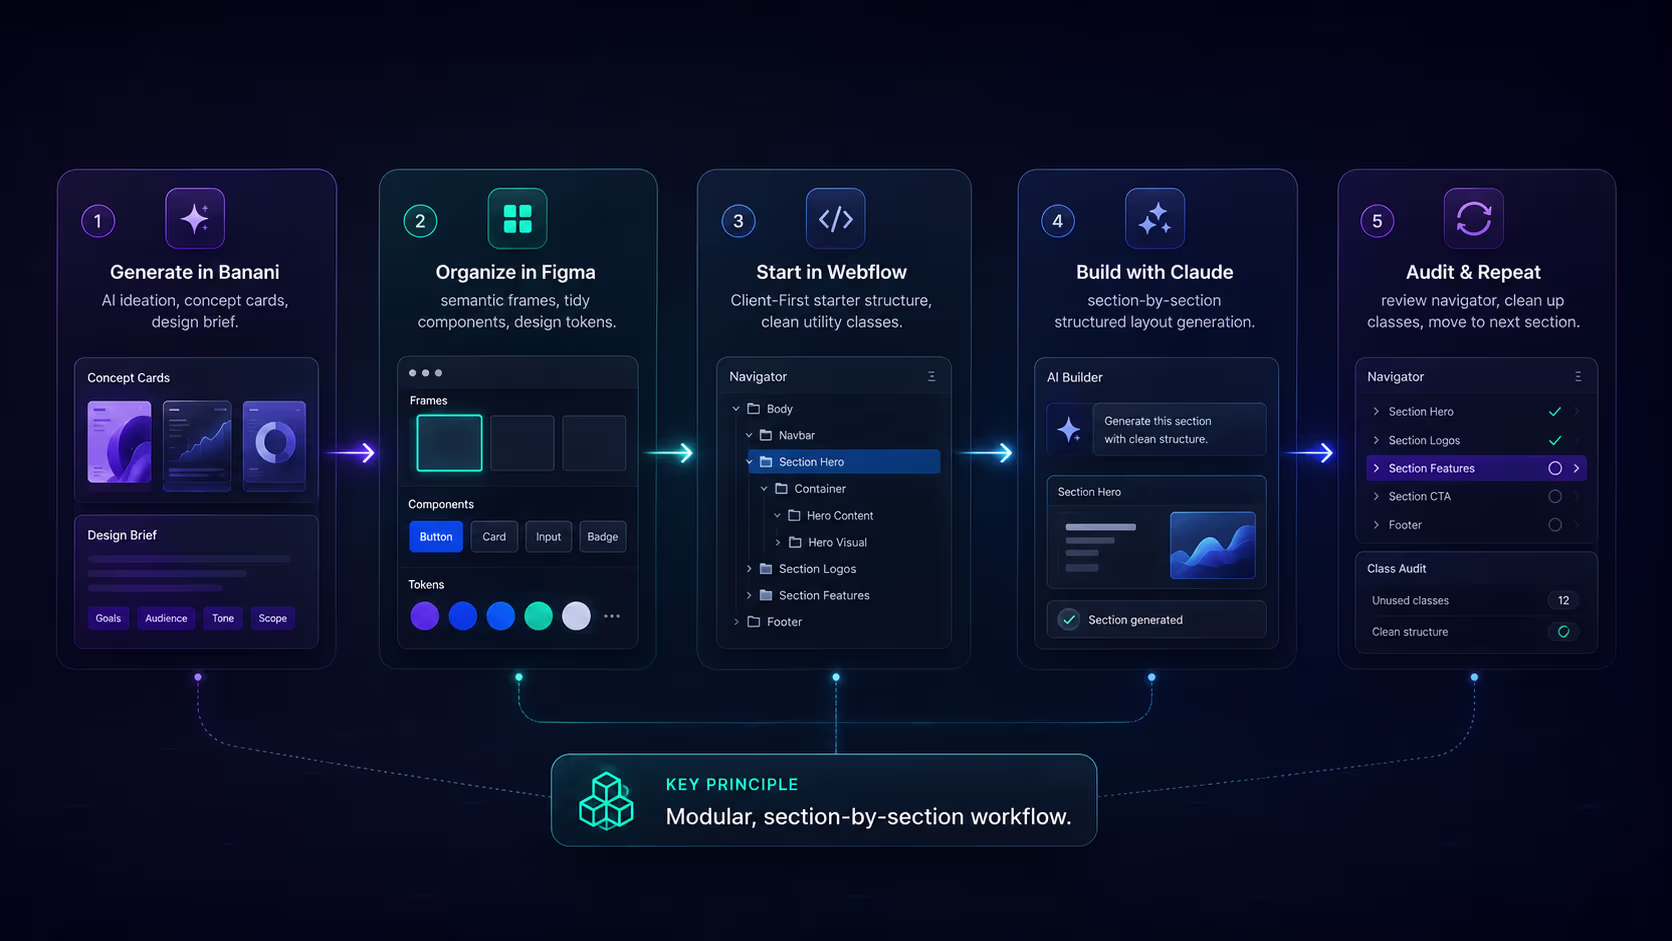
The Step-by-Step Execution Playbook
Moving a design smoothly down this assembly line requires a section-by-section approach. Here is the exact blueprint for executing this workflow:
Step 1: Generate & Export from Banani
Prompt Banani with your specific niche, wireframe intent, and branding direction. Once it renders a layout you love, use its native export option to push the entire canvas cleanly into Figma.
Step 2: Slice and Isolate in Figma
Do not pass the whole page to Claude at once. In Figma, group the messy raw layers into explicit semantic frames named after their page function (e.g., Hero, Features, CTA, Footer).
Step 3: Initialize your Webflow Canvas
Open your Webflow project. Always start with the official Finsweet Client-First Starter Template. This ensures your core utility classes (padding-global, container-large), typography styles, and spacing variables are already cleanly established before Claude touches the file.
Step 4: Run the Structured Claude Prompt
Isolate a single section in Figma (e.g., the Hero) and pass the visual reference to Claude. Accompany the asset with a strict behavioral prompt:
"We are building the Hero Section using the Webflow Designer. You must strictly adhere to Finsweet Client-First guidelines. Nest a <section> HTML tag with the class section_hero, add a padding-global div, a container-large div, and a main hero_component wrapper. Prioritize existing global utility classes for buttons and text. Do not hardcode raw hex values; bind all colors to our site variables."
Step 5: Audit and Repeat
Let Claude execute the layout generation. Take 60 seconds to inspect the Webflow Navigator to ensure the div nesting is perfectly clean, then lock the section and move to the next layout.
The Three-Tier Architecture
To make this workflow operate without breaking, you must treat each tool as a specialized department in a digital agency. Attempting to skip a step or force a tool out of its comfort zone results in broken code and messy layouts.
- Banani AI (The Creative Director): This is your rapid ideation engine. Instead of staring at a blank canvas or scrolling through the same inspiration sites, you prompt Banani to generate high-fidelity UI layouts, micro-copy, and aesthetic color palettes instantly.
- Figma (The Staging Ground): AI layout generators create gorgeous visuals but chaotic layer hierarchies. Figma acts as your parsing chamber. Here, you slice the Banani export into semantic sections and extract design tokens (fonts, hex codes, border-radii).
- Claude (The Client-First Developer): Equipped with the Webflow Model Context Protocol (MCP) or copy-paste layout JSON capabilities, Claude acts as your senior developer. By feeding it strict Client-First documentation, it builds out the structural divs and styles directly on your canvas.
The Step-by-Step Execution Playbook
Moving a design smoothly down this assembly line requires a section-by-section approach. Here is the exact blueprint for executing this workflow:
Step 1: Generate & Export from Banani
Prompt Banani with your specific niche, wireframe intent, and branding direction. Once it renders a layout you love, use its native export option to push the entire canvas cleanly into Figma.
Step 2: Slice and Isolate in Figma
Do not pass the whole page to Claude at once. In Figma, group the messy raw layers into explicit semantic frames named after their page function (e.g., Hero, Features, CTA, Footer).
Step 3: Initialize your Webflow Canvas
Open your Webflow project. Always start with the official Finsweet Client-First Starter Template. This ensures your core utility classes (padding-global, container-large), typography styles, and spacing variables are already cleanly established before Claude touches the file.
Step 4: Run the Structured Claude Prompt
Isolate a single section in Figma (e.g., the Hero) and pass the visual reference to Claude. Accompany the asset with a strict behavioral prompt:
"We are building the Hero Section using the Webflow Designer. You must strictly adhere to Finsweet Client-First guidelines. Nest a <section> HTML tag with the class section_hero, add a padding-global div, a container-large div, and a main hero_component wrapper. Prioritize existing global utility classes for buttons and text. Do not hardcode raw hex values; bind all colors to our site variables."
Step 5: Audit and Repeat
Let Claude execute the layout generation. Take 60 seconds to inspect the Webflow Navigator to ensure the div nesting is perfectly clean, then lock the section and move to the next layout.
Want to apply this to your setup?
AI Automation vs. Manual Stewardship
While this pipeline reduces development time by over 60%, human oversight is what separates a broken AI layout from a marketplace-grade website.
The table below outlines exactly what you should offload to Claude versus what you must handle yourself to maintain a flawless Client-First structure:
| Workflow Phase | What to Delegate to Claude | What You Must Do Manually |
|---|---|---|
| Tokens & Variables | Extracting hex codes, font families, and rem values from the Banani Figma file. | Cross-linking variable tokens to global utility styles (e.g., binding --color-neutral to text classes). |
| Layout Structure | Generating nested div frameworks (section_, padding-global, container-). | Verifying that Claude hasn't invented redundant custom classes (like hero_button) instead of using global utilities. |
| Responsive Design | Adjusting Flexbox and CSS Grid parameters to reflow fluidly across tablet and mobile. | Fine-tuning exact pixel padding or fluid typography scaling overrides at the smallest breakpoints. |
| CMS Architecture | Generating Webflow Collection lists, mapping custom fields, and binding data structures. | Setting up complex dynamic filtering, conditional visibility logic, or third-party integrations. |
| Quality Assurance | Running scripts to audit for empty divs, broken layouts, or unused styling parameters. | Executing Webflow’s "Clean Up" panel to purge redundant styles and submitting to the template marketplace. |
Q: Can AI convert Figma designs to Webflow automatically?
A: Partially. AI — Claude working through the Figma and Webflow MCPs — reliably converts design tokens, layout structure, and CMS bindings, but class hygiene, breakpoint fine-tuning, and interactions still need a developer. Treat Figma-to-Webflow AI as a 60–70% accelerator, not a one-click converter.
Q: What's the best Figma to Webflow AI workflow?
A: Generate or refine the design in Figma (Banani for first drafts), extract tokens and structure with Claude via MCP, scaffold Client-First classes in Webflow, then manually verify global utilities, breakpoints, and Style-panel cleanup — the exact pipeline in this guide.
Want this built for you?
Webflowforge offers AI workflow implementation and Client-First Webflow builds for service companies and SaaS teams. Prefer to skip the build and have it delivered for you? Tell us about your project and we'll scope it with you.
Related guide: Connect Webflow Forms to Notion with Zapier


